Cucumber.js is a Node.js library used for automation. Cucumber.js helps to test our site’s features using pure JavaScript and the Selenium WebDriver.
It is powerful library to setup your testing environment compared to java which requires you to install various packages and jars which seems to be hectic and takes time and sometimes prone to incompatibilities.
But node’s npm manages everything here.
The most interesting thing is that selenium-cucumber-js comes with the selenium driver for Node.js, as well as a reporting mechanism by default. No external setup is required for reporting and selenium driver.
Pre-Requisites:
- Node.js
- selenium-cucumber-js
- chai
- code editor(VS code or any other)
Cucumber has two basic components known as features and scenarios.
What are features?
Features are a file with a .feature extension which has multiple scenarios.
What are Scenarios?
Scenarios are plain English statements which completely state what the feature is and what it is supposed to perform. They are actions taken by the user and the outcome of these actions in the form of a response from the website.
Let us see how we can execute a feature file using cucumber.js
Step 1: Initialize node.js project

Step 2: Create following folders shown below

step-definitions: step-definitions are normal JS files with all the feature testing logic inside. We can use any assertion library like Chai, Assert, etc
page-objects – page objects are global objects accessible in your feature files for using common functions. It is accessible inside your feature file as a page object. Page objects with a separate file are stored as a key in the page object, for example, google-search.js will be available as apage.googleSearch.url, and so on. Remember to use camelCase for key names.
reports: the reports folder is only used by the library for storing the reports
features: we place all the feature files here
Step 3: Install following packages:
$ npm install selenium-cucumber-js –save
$ npm install chai –save

Step 4: Creating a feature file
Our feature file will be testing google search name google-search.feature

Step 5: Creating a Page Object file
Create a file called google-search.js in your page-objects directory.
Step-definition file will access this file.

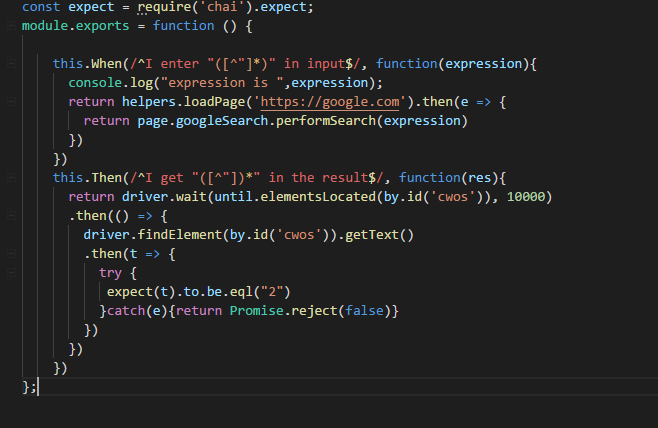
Step 6: Creating Step-Definition file
Step 6: Configure npm test
Configure npm test (This runs a package’s “test” script, if one was provided.) command in package.json
Add test script location

Step 7: Run the test
$ npm test

Step 8: Check Reports in Reports folder

Step 9: Open HTML report file browser to see test results

So that’s a short project for quickly getting started with selenium-cucumber-js.
Hope you all found it interesting .
Try it yourself!
Let me know of any suggestions in the comments!
For official docs check here

Suppose I want to execute two feature files in the same directory, what needs to be changed?
LikeLike
Very very helpful. I was trying to utilize the steps for various features and this is the only link that has actually directly spoken about it. Every where else was so confusing and never mentioned the way of loading all the steps in one file (package.json).
Thank you
LikeLiked by 1 person